
Step 1 : Check Your Hostname.
# hostnamectl
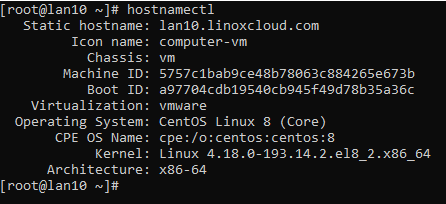
Here lan10.linoxcloud.com Is My Static Hostname / OS Hostname
Step 2 : How To Change Your Hostname
![]()
Here Instead Oflan10.linoxcloud.com You Can Give server.example.com
Step 3: Install Bind Server
# yum install bind bind-utils
![]()
Step 4: Configure Your Firewall Allow ->> DNS To Communicate Through Firewall
firewall-cmd --permanent --add-port=53/udp
firewall-cmd --permanent --add-port=53/tcp
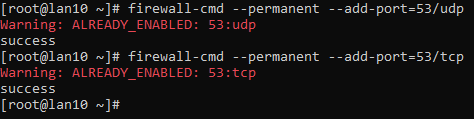
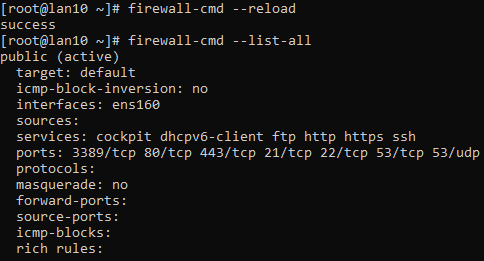
firewall-cmd --reload
![]()
firewall-cmd --list-all
Congratulations! You have made it!
Step 1 : Go To named.conf File Location
# cd /etc
# vim named.conf

Let Me Explain Above Picture –>![]()
Here Give Your Local DHCP IP Address Ex.192.168.x.x or 172.16.x.x or 10.x.x.x
_________________________________________________________________________________________
![]()
Here You Have To Allow Domain Names TO Communicate Through a Device To Any Host Or Perticular IP Address (Public / Private(DHCP))
__________________________________________________________________________________
Create Primary Master DNS Zone File :

__________________________________________________________________________________
Create Slave Master DNS Zone File:
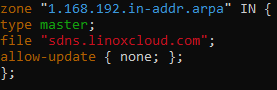
Here IF Your IP Address Is 192.168.1.10 ->> Reverse The IP Address By Removing Last Octet(ex.10)
–> 1.168.192.in-addr.arpa
________________________________________________________________________________________
Lets Create pdns.linoxcloud.com & sdns.linoxcloud.com
# cd /var/named
# cp named.localhost pdns.linoxcloud.com
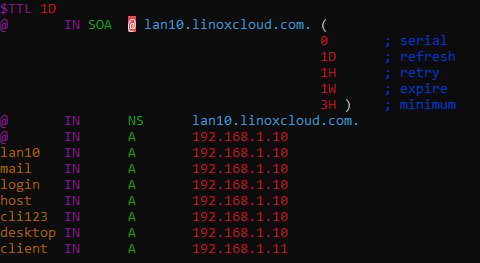
Here –> SOA is Start Of Authority, lan10.linoxcloud.com Is hostname
hostname has To end With . -> Deli Meter
lan10,mail,login,etc., Are CNAMES For The linoxcloud.com
Here –> IN Stands For Internet
–> A is IPV4 Address / AAAA is IPV6 Address
–> NS is Name server / Hostname Ends With . (Must)
# cp pdns.linoxcloud.com sdns.linoxcloud.com
# vim sdns.linoxcloud.com
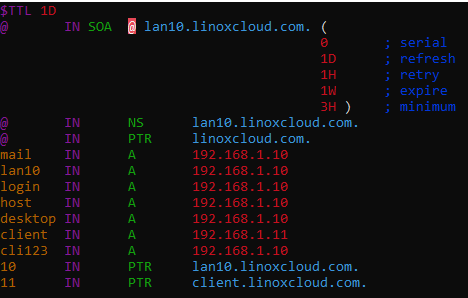
–> PTR Pointer Record For a Domain
–> 10,11 are Last Octet Values Assign To PTR Address ->> lan10.linoxcloud.com / CNAME client.linoxcloud.com
Step 1 : Check named.conf File Configuration is Correct Or Not?
# named-checkconf -z /etc/named.conf
Step 2 : Check PDNS & SDNS Configuration!
# named-checkzone forward /var/named/pdns.linoxcloud.com
# named-checkzone forward /var/named/pdns.linoxcloud.com
# systemctl restart named
Pictures :
Check named.conf File
Success Hurrah!!
Check pdns.linoxcloud.com
Check sdns.linoxcloud.com
Restart named Service![]()
Congratulations! You have made it!
Working Procedure :
Step 1 : Open Your Router Virtual Routing Settings: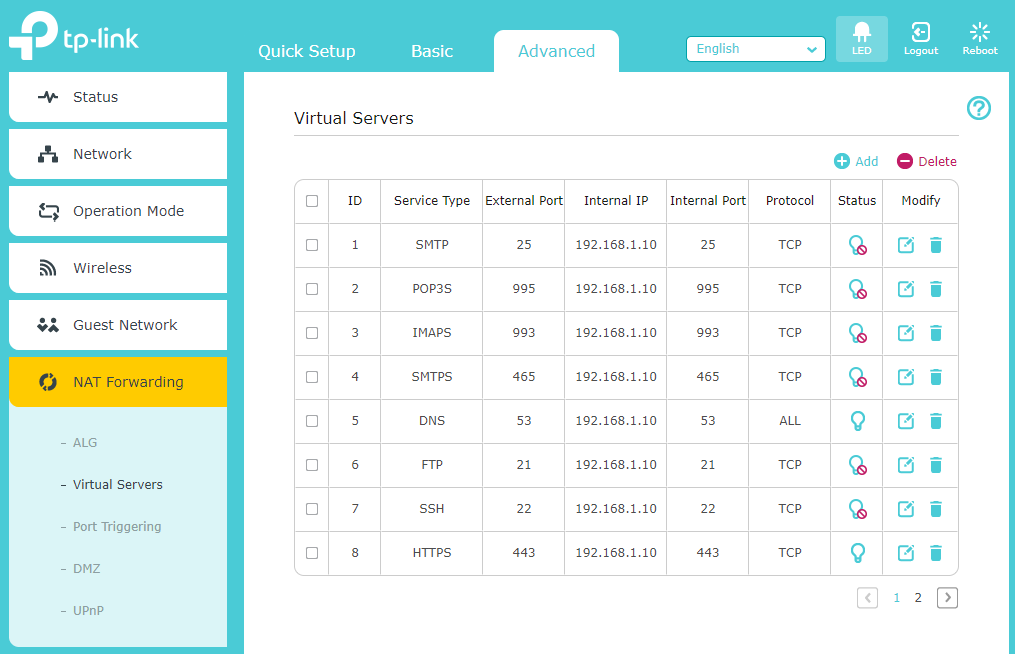
–> Allow DNS 53 Port Both TCP / UDP / ALL
Step 2 :

Public IP IS 175.101.82.151 And Local IP IS 192.168.1.10 (Mine) , Yours Might Be Different
Step 3 :
Done Successfully Configured DNS Server Now It Resolves Hostnames To An IP Address Assigned in PDNS & SDNS.


More Stories
Squid Proxy
Firewall
Zimbra Troubleshooting