
Step 1: Installing FTP Server
1. Installing vsftpd server is straight forward, just run the following command in the terminal.
# yum install vsftpd
2. After the installation completes, the service will be disabled at first, so we need to start it manually for the time being and enable it to start automatically from the next system boot as well:
# systemctl start vsftpd
# systemctl enable vsftpd
3. Next, in order to allow access to FTP services from external systems, we have to open port 21, where the FTP daemons are listening as follows:
# firewall-cmd --zone=public --permanent --add-port=21/tcp
# firewall-cmd --zone=public --permanent --add-service=ftp
# firewall-cmd --reload
Step 2: Configuring FTP Server
4. Now we will move over to perform a few configurations to setup and secure our FTP server, let us start by making a backup of the original config file /etc/vsftpd/vsftpd.conf:
# cp /etc/vsftpd/vsftpd.conf /etc/vsftpd/vsftpd.conf.orig
Next, open the config file above and set the following options with these corresponding values:
anonymous_enable=NO             # disable  anonymous login
local_enable=YES		# permit local logins
write_enable=YES		# enable FTP commands which change the filesystem
local_umask=022		        # value of umask for file creation for local users
dirmessage_enable=YES	        # enable showing of messages when users first enter a new directory
xferlog_enable=YES		# a log file will be maintained detailing uploads and downloads
connect_from_port_20=YES        # use port 20 (ftp-data) on the server machine for PORT style connections
xferlog_std_format=YES          # keep standard log file format
listen=NO   			# prevent vsftpd from running in standalone mode
listen_ipv6=YES		        # vsftpd will listen on an IPv6 socket instead of an IPv4 one
pam_service_name=vsftpd         # name of the PAM service vsftpd will use
userlist_enable=NO              # disable vsftpd to load a list of usernames
Note :- We Disabled userlist In This Method.
systenctl restart vsftpd
systenctl status vsftpd
Open ftp://ip Login With Username And Password Of Your System User.
Note : You Can’t Login As A Root UserCongratulations! You have made it!
Step 1: Installing FTP Server
1. Installing vsftpd server is straight forward, just run the following command in the terminal.
# yum install vsftpd
2. After the installation completes, the service will be disabled at first, so we need to start it manually for the time being and enable it to start automatically from the next system boot as well:
# systemctl start vsftpd
# systemctl enable vsftpd
3. Next, in order to allow access to FTP services from external systems, we have to open port 21, where the FTP daemons are listening as follows:
# firewall-cmd --zone=public --permanent --add-port=21/tcp
# firewall-cmd --zone=public --permanent --add-service=ftp
# firewall-cmd --reload
Step 2: Configuring FTP Server
4. Now we will move over to perform a few configurations to setup and secure our FTP server, let us start by making a backup of the original config file /etc/vsftpd/vsftpd.conf:
# cp /etc/vsftpd/vsftpd.conf /etc/vsftpd/vsftpd.conf.orig
Next, open the config file above and set the following options with these corresponding values:
anonymous_enable=NO             # disable  anonymous login
local_enable=YES		# permit local logins
write_enable=YES		# enable FTP commands which change the filesystem
local_umask=022		        # value of umask for file creation for local users
dirmessage_enable=YES	        # enable showing of messages when users first enter a new directory
xferlog_enable=YES		# a log file will be maintained detailing uploads and downloads
connect_from_port_20=YES        # use port 20 (ftp-data) on the server machine for PORT style connections
xferlog_std_format=YES          # keep standard log file format
listen=NO   			# prevent vsftpd from running in standalone mode
listen_ipv6=YES		        # vsftpd will listen on an IPv6 socket instead of an IPv4 one
pam_service_name=vsftpd         # name of the PAM service vsftpd will use
userlist_enable=YES             # enable vsftpd to load a list of usernames
tcp_wrappers=YES  		# turn on tcp wrappers
Note :- We enabled userlist In This Method.
5. Now configure FTP to allow/deny FTP access to users based on the user list file /etc/vsftpd/user_list
By default, users listed in userlist_file=/etc/vsftpd/user_list are denied login access with userlist_deny option set to YES, if userlist_enable=YES.
However, userlist_deny=NO alters the setting, meaning that only users explicitly listed in userlist_file=/etc/vsftpd/user_list will be permitted to login.
userlist_enable=YES                   # vsftpd will load a list of usernames, from the filename given by userlist_file
userlist_file=/etc/vsftpd/user_list   # stores usernames.
userlist_deny=NO
That’s not all, when users login to the FTP server, they are placed in a chroot’ed jail, this is the local root directory which will act as their home directory for the FTP session only.
Next, we will look at two possible scenarios of how to chroot FTP users to Home directories (local root) directory for FTP users, as explained below.
6. Now add these two following options to restrict FTP users to their Home directories.
chroot_local_user=YES
allow_writeable_chroot=YES
chroot_local_user=YES means local users will be placed in a chroot jail, their home directory after login by default settings.
And also by default, vsftpd does not allow the chroot jail directory to be writable for security reasons, however, we can use the option allow_writeable_chroot=YES to override this setting.
Save the file and close it.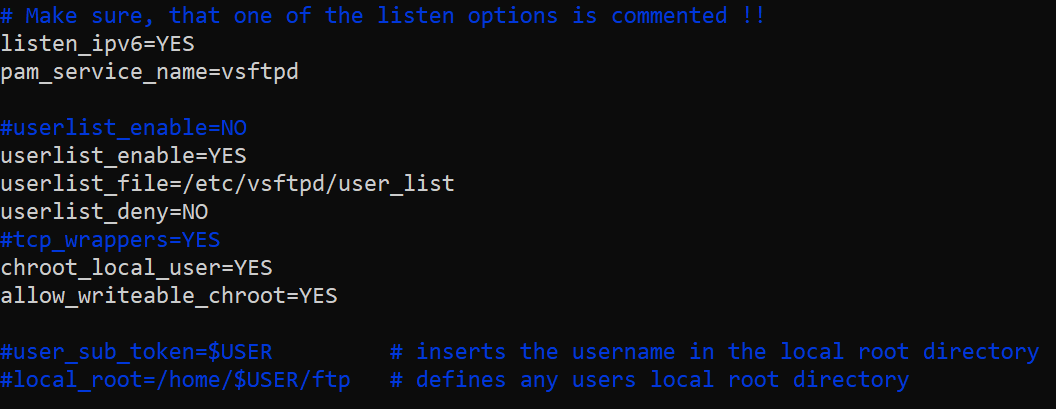
Securing FTP Server with SELinux
7. Now, let’s set the SELinux boolean below to allow FTP to read files in a user’s home directory. Note that this was initially done using the the command:
#setsebool -P tftp_home_dir onHowever, the ftp_home_dir directive has been disabled by default as explained in this bug report: https://bugzilla.redhat.com/show_bug.cgi?id=1097775.
Now we will use semanage command to set SELinux rule to allow FTP to read/write user’s home directory.
# semanage boolean -m ftpd_full_access --on
At this point, we have to restart vsftpd to effect all the changes we made so far above:
Step 4: Testing FTP Server
8. Now we will test FTP server by creating a FTP user with useradd command.
# useradd -m -c "prasanth taviti, CEO” -s /bin/bash prasanth
# passwd prasanth
Afterwards, we have to add the user prasanth to the file /etc/vsftpd/user_list using the echo command as follows:
# echo "prasanth" | tee -a /etc/vsftpd/user_list
# cat /etc/vsftpd/user_list
9. Now it’s time to test if our settings above are working correctly. Let’s start by testing anonymous logins, we can see from the screen shot below that anonymous logins are not permitted: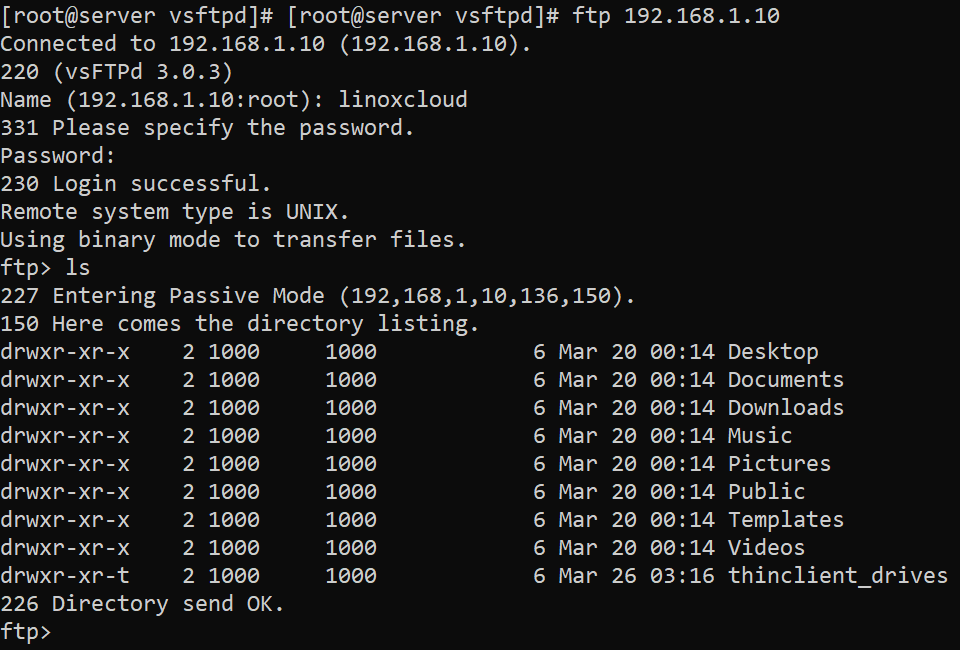
Warning: Using allow_writeable_chroot=YES has certain security implications, especially if the users have upload permission, or shell access.
Only activate this option if you exactly know what you are doing. It’s important to note that these security implications arenot vsftpd specific, they apply to all FTP daemons which offer to put local users in chroot jails as well.
Therefore, we will look at a more secure way of setting a different non-writable local root directory in the next section.
Step 5: Configure Different FTP User Home Directories
12. Open the vsftpd configuration file again and start by commenting the unsecure option below:
#allow_writeable_chroot=YES
Then create the alternative local root directory for the user (prasanth, yours is probably different) and remove write permissions to all users to this directory:
# mkdir /home/prasanth/ftp
# chown nobody:nobody /home/prasanth/ftp
# chmod a-w /home/prasanth/ftp
13. Next, create a directory under the local root where the user will store his/her files:
# mkdir /home/prasanth/ftp/files
# chown prasanth:prasanth  /home/prasanth/ftp/files
# chmod 0700 /home/prasanth/ftp/files/
Then add/modify the following options in the vsftpd config file with these values:
user_sub_token=$USER         # inserts the username in the local root directory
local_root=/home/$USER/ftp   # defines any users local root directory
Save the file and close it. Once again, let’s restart the service with the new settings:
# systemctl restart vsftpd
14. Now do a final test again and see that the users local root directory is the FTP directory we created in his home directory.
systemctl restart vsftpd
systemctl status vsftpd
Open ftp://ip Login With Username And Password Of Your System User.
Note : You Can’t Login As A Root UserCongratulations! You have made it!


More Stories
Squid Proxy
Firewall
Zimbra Troubleshooting